My cousin had her baby shower in April and I love the diaper cakes that she received!


A friend from work is having a baby shower and I decided to try to make one myself. As I have said before, I am not the best at artsy projects but I decided to at least try it.
So, I took her basic guide and added a few extras!
How To Make a Diaper Cake
First you need to buy supplies. Do NOT go to babies r us! Their prices are crazy high! I recommend Target or Walmart. What is nice about this project is that you can spend as little or as much as you want depending on how much decoration you add.
Supplies:
-diapers- pack of 50. More diapers=bigger cake (Target has the cutest generic diapers. They have blue and green dots!)
-Ribbon- 99 cents curling ribbon and some fabric ribbon
-rubberbands- I just used a pack I had at home but I would have been nice to have smaller
ones to wrap the diapers.
-bottle of baby shampoo
-decorations- I bought pacifiers, a two pack rattle, a bow, baby shower mini decorations, mini Johnson and Johnson travel set, dog stuffed animal, pair of socks and a bib
-stapler or tape- may need for fabric ribbon
-cardboard or tray to hold cake- helps to transfer
Step by Step
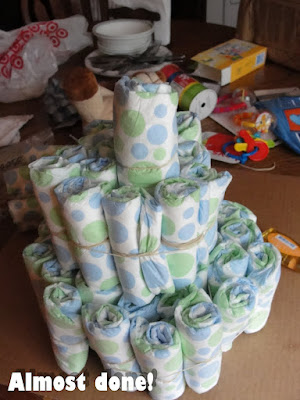
1. Roll all the diapers! Roll from the side with the sides this will make the diaper look neater! Also try to keep the rubberbands in the middle of the row. It will be easier to cover with ribbon!

2. Once all of the diapers are rolled, start placing the rolls around the baby shampoo. You may need another person to help you or you can just place the rubber band on first and stuff the diaper after it is on.

3. Continue making layers. Since I had smaller rubberbands, I had to use one rubberband for a half circle. The number of layers depends on how many diapers you buy. I had 3 on the bottom, 2 in the middle and 1 one the top!
~Looks off center but I just reorganized a bit!~
4. Once I finished the layers, I started adding the ribbon. I started with fabric white ribbon and the added either blue or green curling ribbon.
5. Finally add all the goodies. I used the ribbon to tie the stuffed dog around the waist to make it sit on top.

6. For the cardboard bottom, I covered it with green tissue paper and added a bow and a bib.
~Close up~
All in all, I am so proud of the finished project. Maybe I can be artistic after all? I could be the next DIY PRO!
What should my next project be??


it looks WONDERFUL! way better than mine! can i feature your post on my blog!
ReplyDeleteThanks! I was so happy that I found your post so I could learn how to make it! You could totally feature it. ;)
ReplyDelete